Katalon Web Recorder Plus
This document introduces Katalon Web Recorder Plus - an enhanced version of Web Recorder.
- AI Recording Agent is currently available as a beta feature. In the beta phase, it is for evaluation purposes only and not recommended for production use.
Overview
Katalon Web Recorder Plus (Web Recorder Plus) is an enhancement of Web Recorder that provides features of the classic Web Recorder, and more:
-
Enhanced support for advanced web apps: Flutter apps, apps with HTML5 Canvas elements, and closed Shadow DOM.
-
More supported actions: Hover actions, mouse-over, and mouse-down events.
-
New text attribute: New @text attribute to capture the original element text.
-
Enhanced event handling: Support for pointer event phases to improve accuracy.
-
Optimized performance: Locator caching for faster interaction and improved stability.
-
AI Recording Agent: Quick swap between generating tests from natural language prompts and manual recording and edits for precision control.
-
Advanced Configuration: Review and edit captured object attributes, match conditions, and parent object information during a recording session before saving the object.
-
Object Repository reuse: Loads your project's whole Object Repository when the recorder opens, and flags recorded objects that duplicate an existing object or aren't used by any step so you can avoid creating redundant test objects.
-
Delete recorded objects: Remove a captured object, a whole folder of objects, or multiple selections directly from the Captured Objects tab, with automatic step reference cleanup.
Set up for Web Recorder Plus
- Install KS Recording Engine Extension for active browser mode and custom capabilities mode.
Enable Web Recorder Plus in Katalon Studio
From the main menu, go to Preferences... > Katalon > Recorder Mode and enable Katalon Web Recorder Plus.
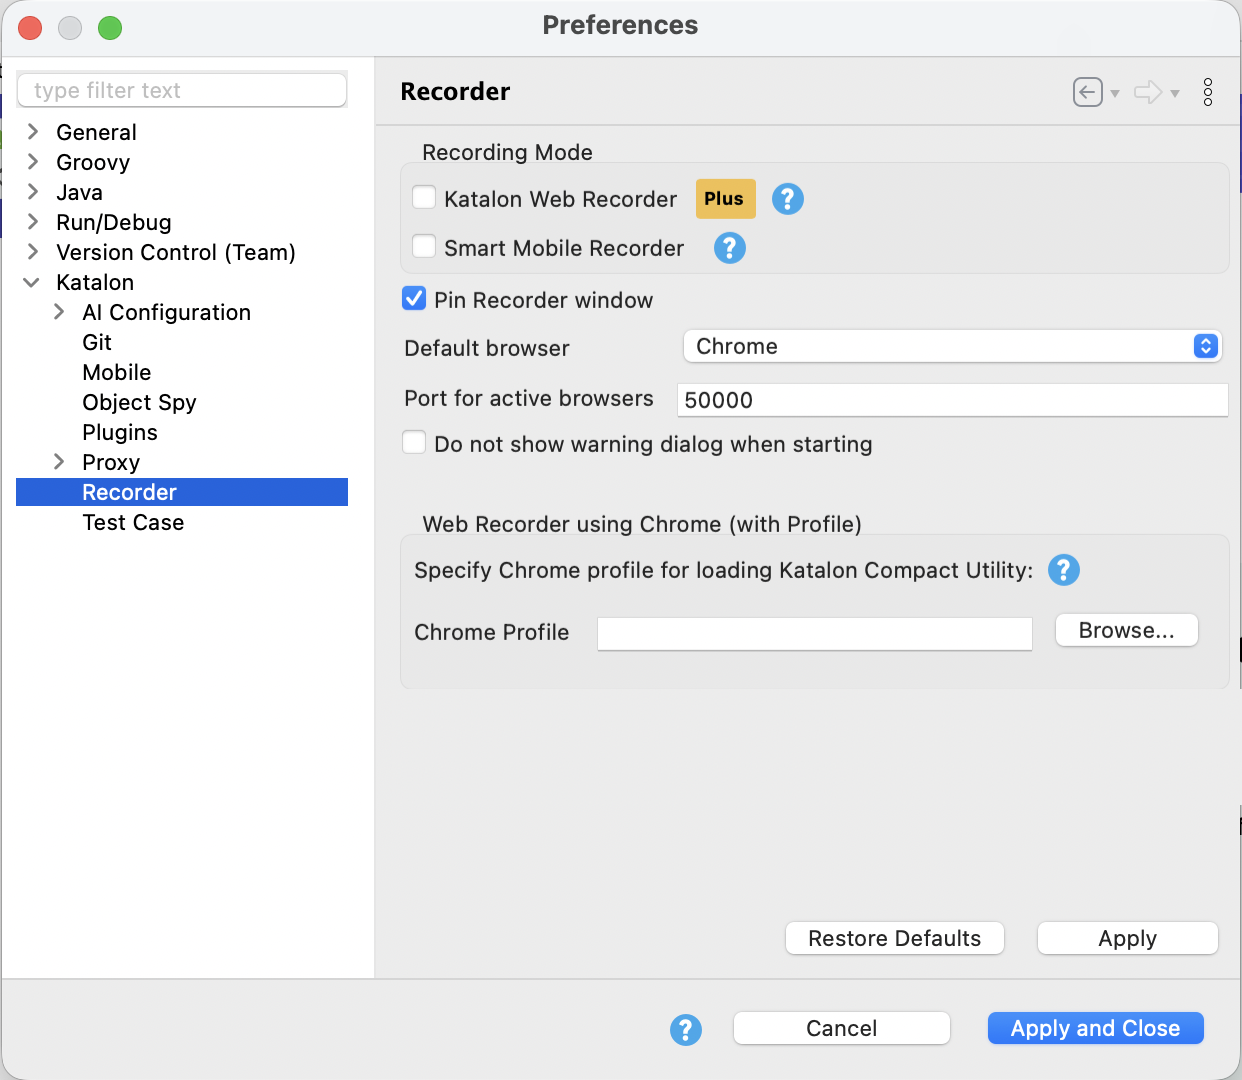
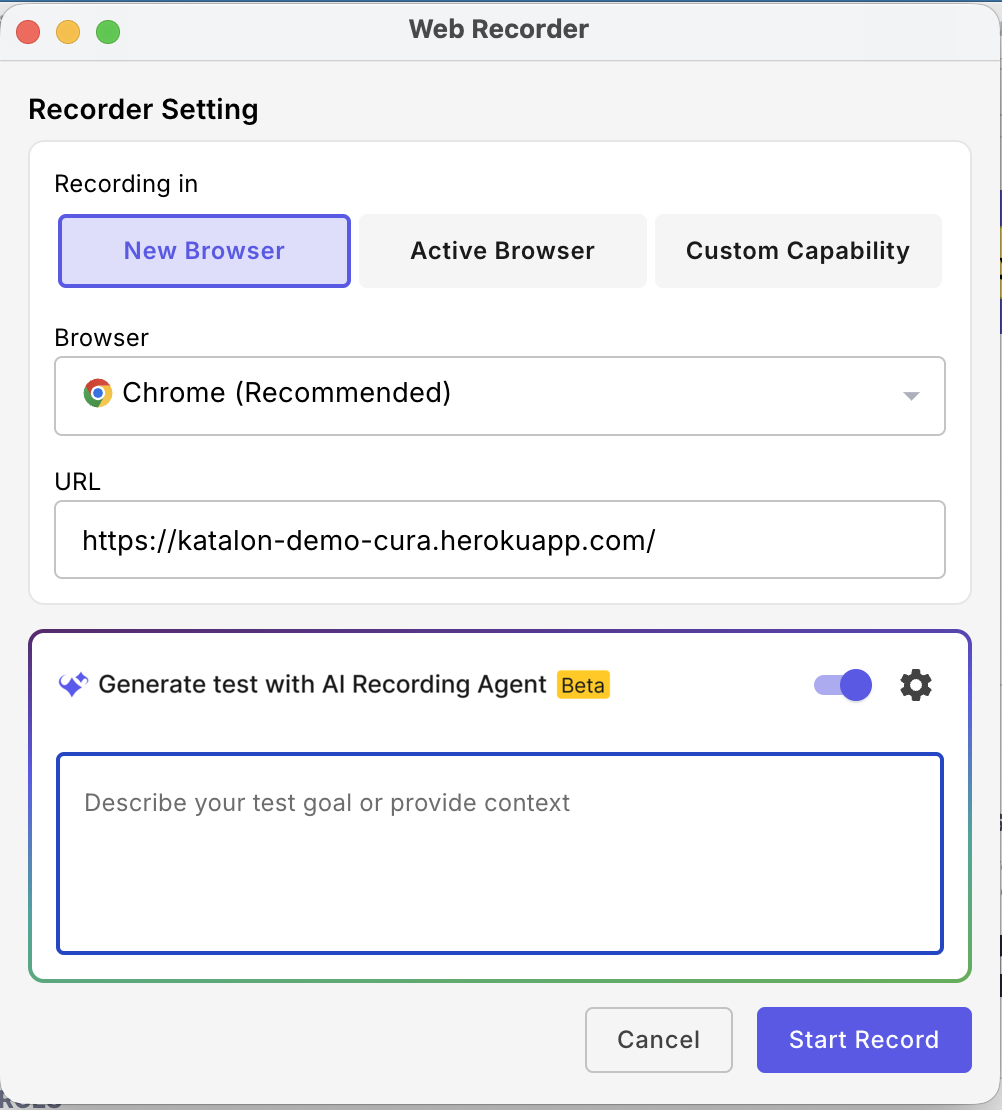
Once enabled, selecting Katalon Web Recorder opens Web Recorder Plus instead.
Enable AI Recording Agent (beta)
- A valid API key from a vision-supported model. Consult your AI provider's official documentation to learn more. (e.g. learn more about OpenAI's vision-supported models at Image vision in OpenAI)
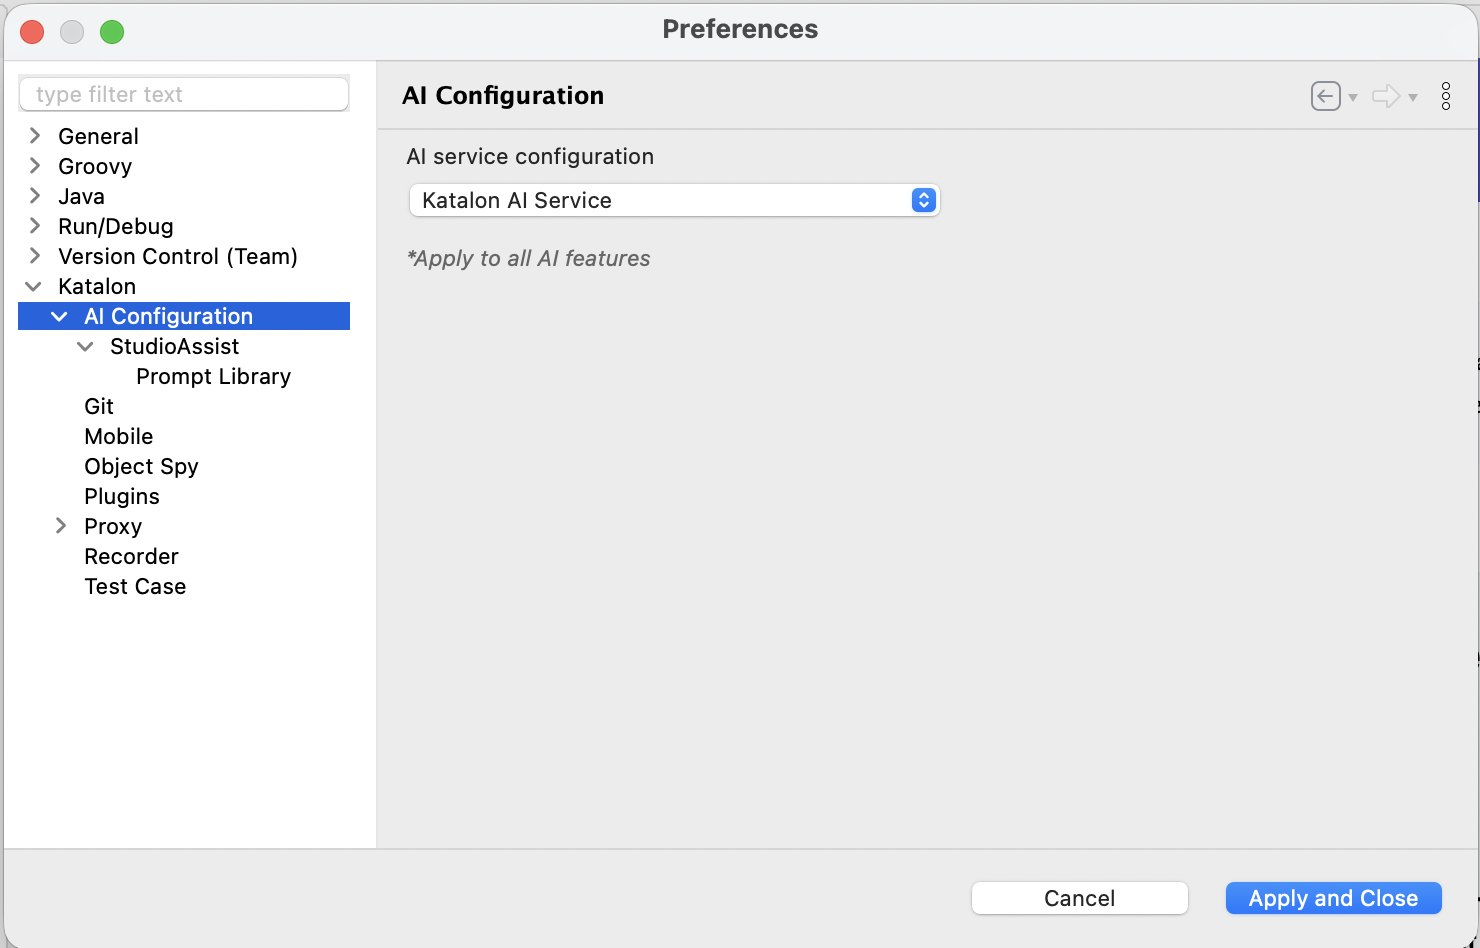
- Go to Preferences > AI Configuration
- Select a provider and provide your personal OpenAPI key from a vision-supported model. If the used model doesn't support vision, AI Recording Agent cannot crawl the site's UI.
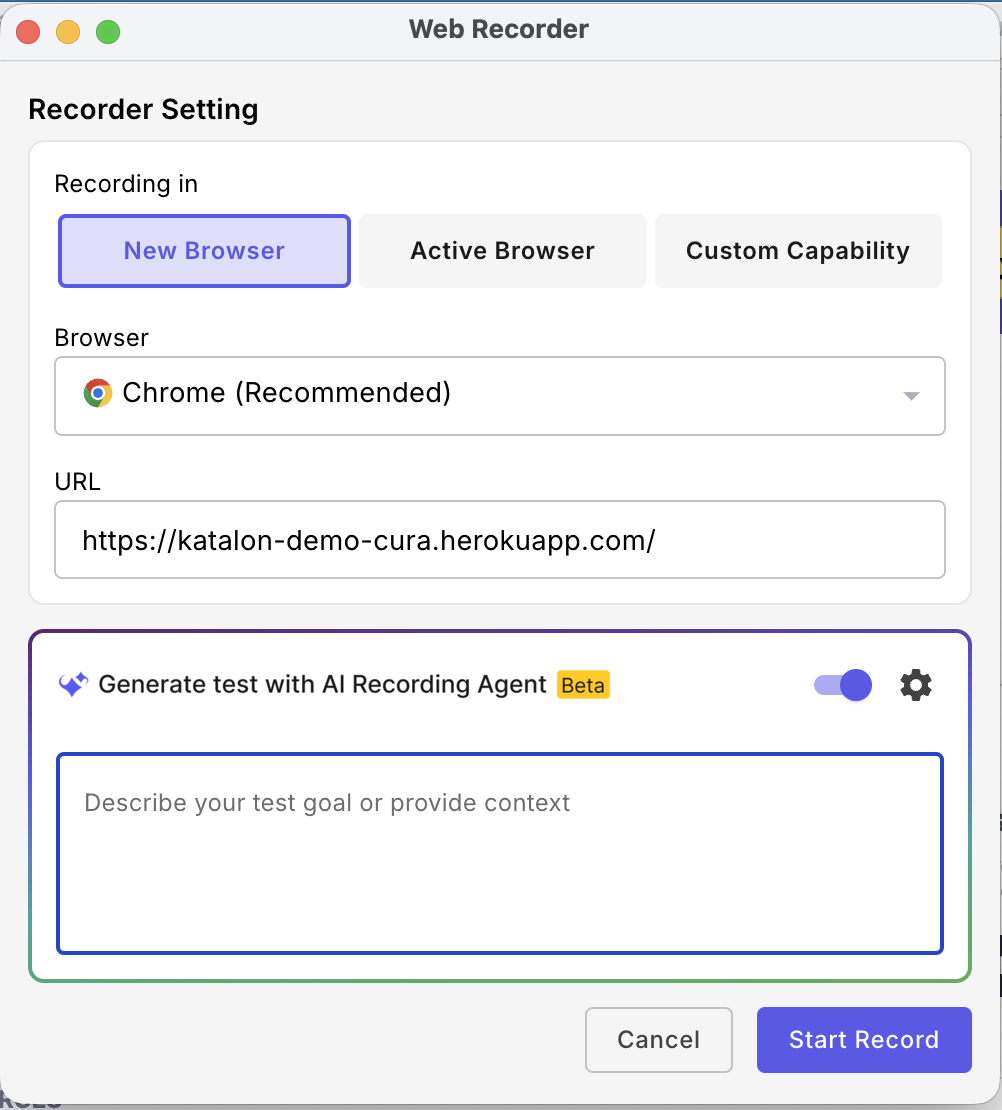
Then, you can enable the AI Web Recording Agent and start using:
Workflows with Web Recorder Plus
Record a new session
Find below a demo of a typical workflow with Katalon Web Recorder Plus:
-
Once you've enabled Katalon Web Recorder Plus, click Katalon Web Recorder to open Web Recorder Plus.
-
Choose to start recording in a new browser, active browser, or in custom capability mode. Quick start by selecting new browser mode.
-
Select your preferred browser from the dropdown list.
-
Enter a valid URL for the web application you want to record.
-
Click Start Record to launch a new browser session and begin recording.
-
-
Recording controls:
-
As you interact with your web application, actions and test objects are automatically captured.
-
You can pause/resume recording to interact with the app's UI without recording the interaction.
-
You can switch between browsers while recording - KS will pause recording to avoid issues. Once you're all set, click Resume to continue.
-
Run steps to verify actions, then view Running Logs to see the execution status, step results, and any errors that occur during playback.
-
Save your progress at any time.
-
-
Prompt AI Recording Agent to generate or edit test steps for you. The steps will be generated and executed, and the AUT's UI will display the changes live.
Configure captured objects with Advanced Configuration
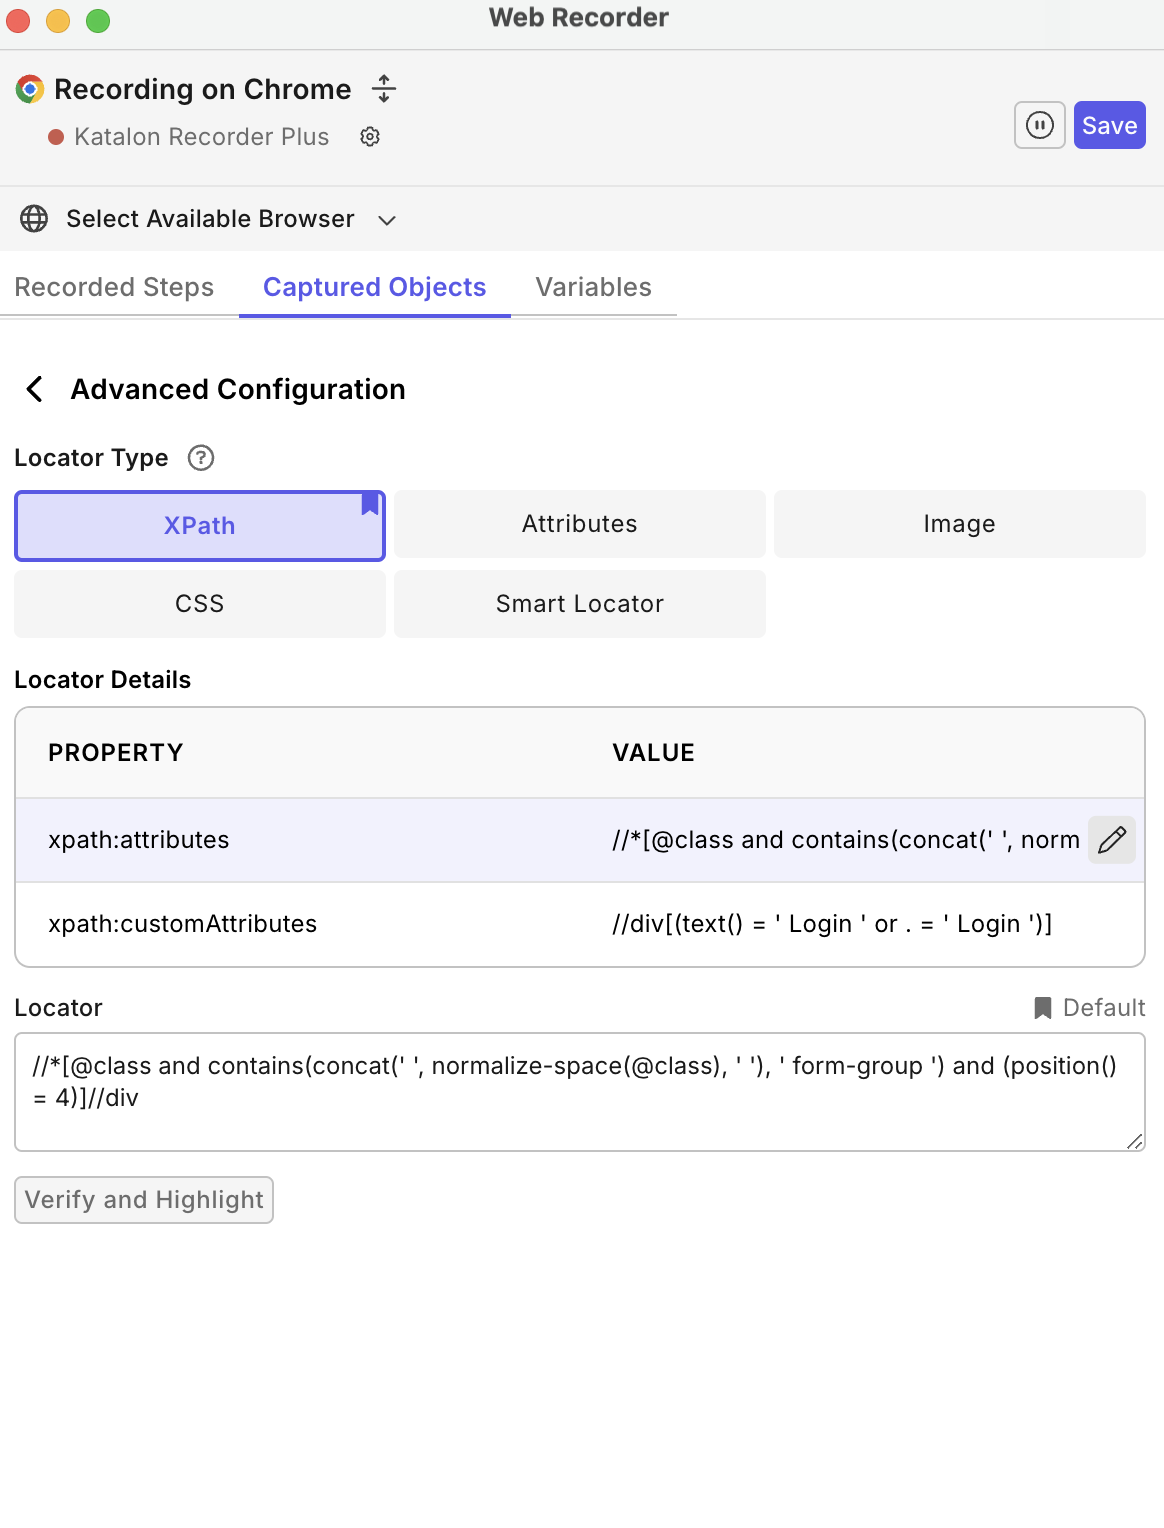
Use Advanced Configuration to review and fine-tune a captured object before you save it to the Object Repository. This is useful when you want to adjust locator attributes, change match conditions, or verify parent object information for elements inside iframes or shadow DOM structures.
To configure a captured object:
- In an active Web Recorder Plus session, open the Captured Objects panel.
- Select the object you want to update, then open Advanced Configuration.
- Review the object's locator and attributes.
- Add, remove, select, or clear attributes used for object identification.
- Edit a match condition, such as
not_equals,not_match_regex, ornot_contains, then save the change. - For objects inside an iframe or shadow DOM structure, review the parent object information and update the parent type or parent field when needed.
- Click Save to apply the configuration. The updated object is included when you save the recorded test case and captured objects.
Duplicate attribute names are validated when you save the configuration. If you add an attribute that already exists, update the attribute name before saving.
Generate a Web UI test case with AI
With AI Recording Agent, you can now initiate the test generation with prompts instead of manual capturing/writing:
- Open Web Recorder Plus and toggle AI Recording Agent (beta) to get started.
- Enter a prompt, then see the AI agent generate test steps/execute each step live on the app's UI.
- To adjust mid-prompt, stop the generation to make the prompt field editable again. Enter your new prompt, and let the agent re-generate the steps based on the new input.
- If you encounter issues, it's likely that the agent can't see the element. Check the web UI, then adjust the prompt and run the agent again.
- Once you're done, save all script/captured objects as a new test case/test objects. You can then continue refining the test case in Web Recorder Plus.
Features
Browser types
- Active Browser modes require the Recorder Engine extension. View setting up instructions at Install Recorder Engine Extension
- Selecting a browser profile requires the Recorder Engine extension installed for that profile.
Web Recorder Plus allows recording session starting in a new browser, an active browser, or in a custom capability-configured browser:
- With a new browser, you need to select your browser (chrome, ...) and provide an URL.
- With an active browser, you need to select the active browser.
Each browser shows a status label (e.g., Compatible or Incompatible). An incompatible label indicates that the current KS version and the Recorder Engine are not compatible - upgrade to the compatible version for the best recording experience.
- In Active Browser mode, if element highlighting (green rectangles) are not present, this indicates that recorder plus is not working. Try:
- Refresh the page
- End the session, disable/re-enable recording extension, and try again
- With Custom Capability Browser mode, you need to configure the browser specifications (see Configure Custom Profile) and start recording in this pre-configured browser.
Recording from an existing test case
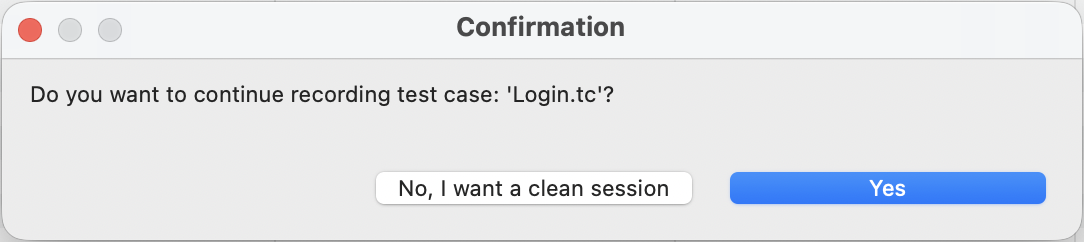
Web Recorder Plus allows you to build on an existing test case. Open the test case, then click the Record Web icon. Katalon Studio asks if you want to record on top of the existing test case.
When the selected test case already has recorded steps, Web Recorder Plus automatically expands the recorder dialog so you can review the existing steps without resizing the dialog manually.
Supported actions
Apart from basic actions (click, set texts, ...) Web Recorder Plus allows handling mouse-down and mouse-over (hover) events.
When you record in Active Browser mode, Web Recorder Plus does not capture the existing URL on the active browser as a “navigate to URL” step (WebUI.navigateToUrl) . To do so, click the browser's URL bar with the URL, and hit Enter to perform and record the "navigate to URL" action.
When you hover over an element, use these shortcuts to copy its locator to your clipboard, making it much easier to reuse in test scripts:
-
macOS: Use Option + C (or Shift + Option + C)
-
Windows: Use Alt + C
Edit a test case during a recording session
Web Recorder Plus consolidates recording into a single dialog with three tabs: Recorded Steps, Captured Objects, and Variables. You can review, edit, and run test steps without ending the recording session. The recorder displays the Recorded Steps and Running Logs panels side by side. Drag the divider between the panels to resize them and focus on either the test case or its playback results.
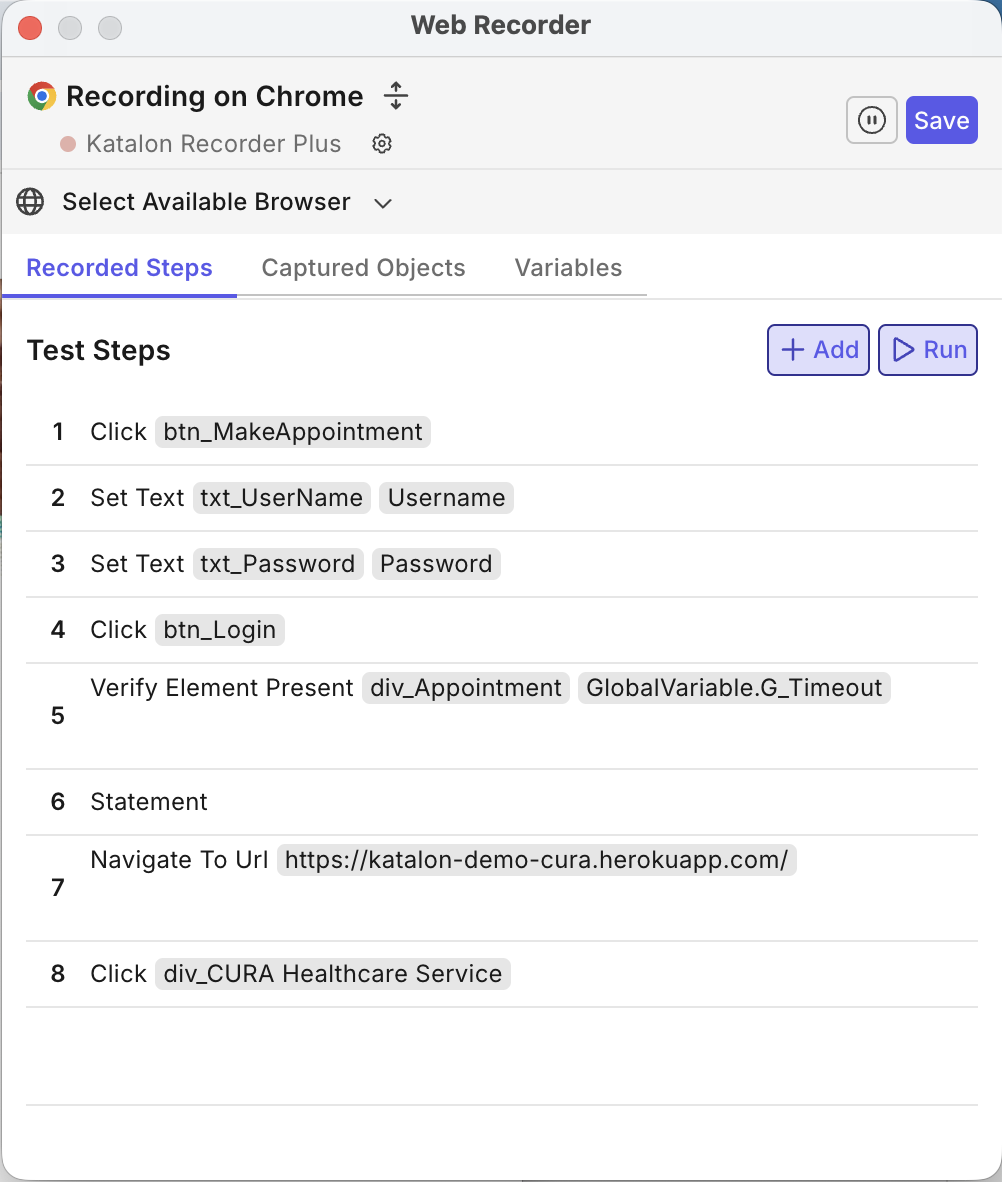
In the Recorded Steps panel, you can:
- View, delete, or reorder statements.
- Selectively run recorded steps and review their results in Running Logs.
- Change a step's keyword, including a custom keyword with a long package path.
- Edit keyword parameters directly in the step details.
- Click the edit icon next to a parameter to change its Value Type when the parameter supports multiple value types. For example, you can save a numeric input as a
Stringwhen the selected keyword expects a string parameter.
Your changes remain in the current recording session and are included when you save the test case.
You can also choose a default locator, and verify/highlight the locator on the live app UI. Use Advanced Configuration to edit locator attributes, update match conditions, configure selected attributes, and review parent information before saving captured objects.
Review and manage captured objects
The Captured Objects tab shows the objects captured during the current recording session alongside the objects already available in the Object Repository. Use this tab to review and edit captured objects, reuse existing objects, or remove unnecessary objects before saving the recording.
Web Recorder Plus adds indicators to help you avoid adding duplicate or unreferenced objects to the Object Repository:
- N DUPLICATE(S): Indicates that a captured object matches an existing repository object. Reuse the existing object in the step editor or delete the duplicate.
- NOT USED: Indicates that no recorded step references the captured object. You can delete it, or leave it out of the Object Repository when saving.
Web Recorder Plus considers two objects duplicates only when their identifying attributes—tag, text, id, src, href, and shadowroot—match and both objects are in the same frame or shadow-root context.
Delete recorded objects
In the Captured Objects tab, hover over a recorded object or folder and click its delete icon to remove it from the current session.
Delete an object or folder:
- Hover over the object or folder you want to remove, then click its delete icon.
- In the Delete recorded object dialog, review what will be deleted:
- For an object, the dialog shows the object name and the number of recorded steps that reference it.
- For a folder, the dialog shows the folder name and the number of objects it contains. Deleting a folder removes all objects inside it, including objects in nested iframe folders. The dialog also shows how many recorded steps are affected.
- Click Delete to confirm, or Cancel to keep the object or folder.
To delete multiple recorded objects, hold Shift and click the recorded objects or folders to select them in bulk, then delete the selection.
- Deleting an object or folder clears the object reference from every recorded step that uses it. The affected steps are not removed; their Test Object field displays
null. - An empty folder — for example, after you delete its only object — stays visible in the Captured Objects tree. It is not removed automatically, and it is still included when you save your recording to the Object Repository.
- Deleting a recorded object or folder cannot be undone within the recording session.
Intention groups
Intention groups organize generated, recorded, and manually edited test steps under named parent steps that describe the user's intent, such as Login or Add item to cart. This gives the recorded test a readable hierarchy from the test case to the intention and then to the automation steps that fulfill it.
Use intention groups to review and maintain long recorded flows more easily. They help connect business-level test intent with the low-level actions captured by Web Recorder Plus, which makes generated and manual steps easier to trace, debug, and update.
AI Recording Agent (beta)
Instead of writing/editing the test steps manually, you can now ask the agent to generate and make edits for you.
Starting v11.1.2, AI Recording Agent (beta) supports context-awareness and step generation from an existing test case. Features like generating multiple test cases at once will be supported in future releases.
The agent first converts your prompt into a Test Plan with clear steps, then sticks to this plan to work on each step sequentially. Each step is first generated, then executed to reflect live on the app’s UI. This removes friction between writing and validating test steps.
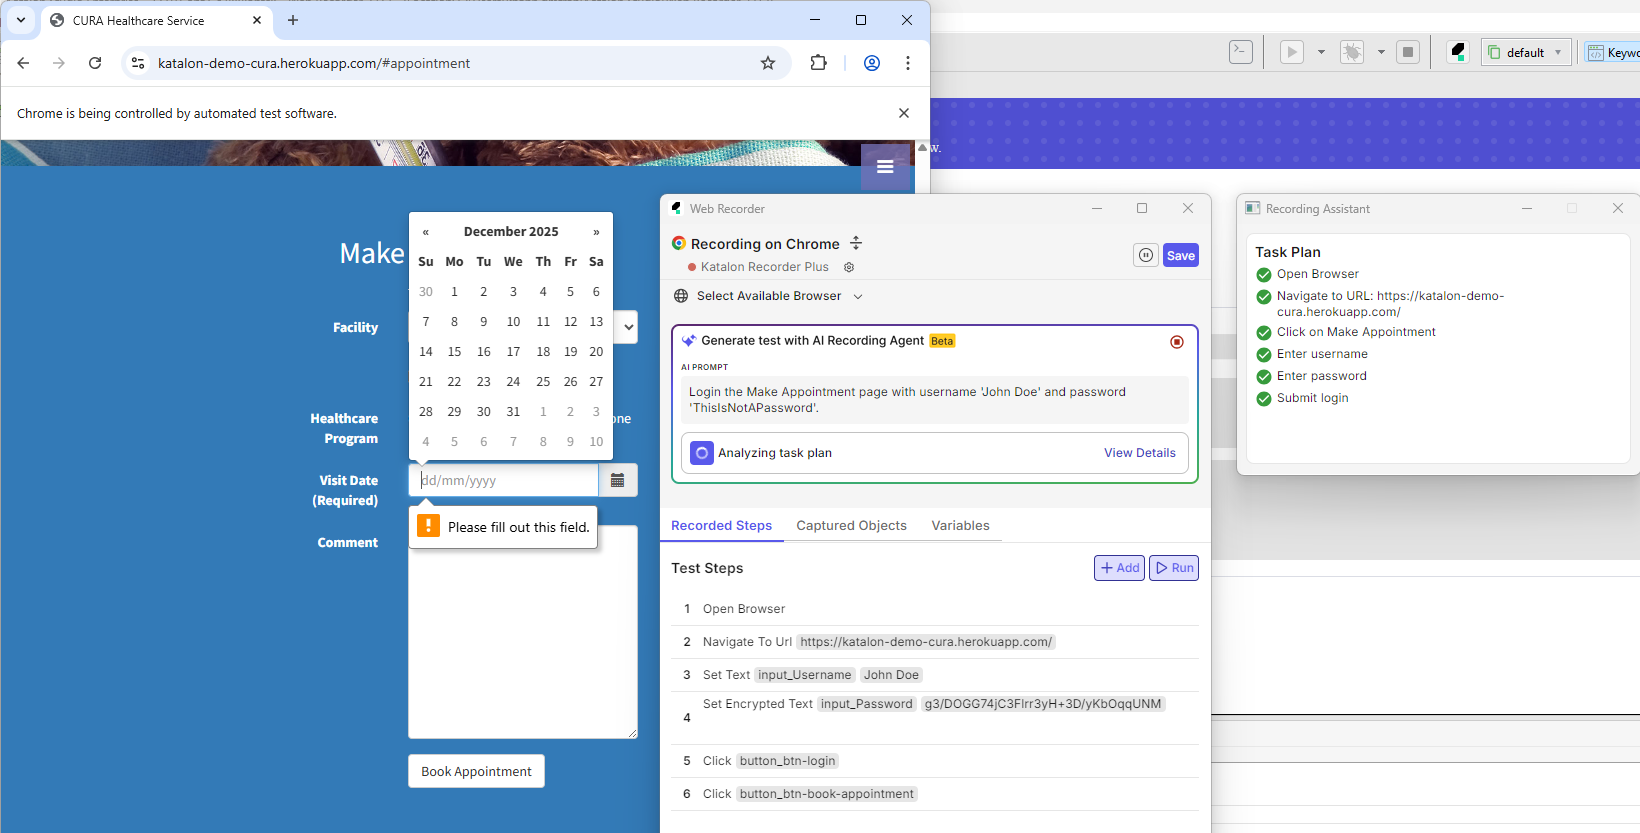
It's recommended that you structure your prompt as a numbered list of steps, like the example below. It's also helpful to mention any test objects your project already has.
1. Open Browser.
2. Navigate to https://katalon-demo-cura.herokuapp.com/
3. Click Make Appointment.
4. Input the sample username and password given on the page.
5. Click the login button.
6. Log out.
Generating steps on top of existing scripts
You can generate new steps on top of:
- Generated steps, in the current recording session.
- An existing test case.
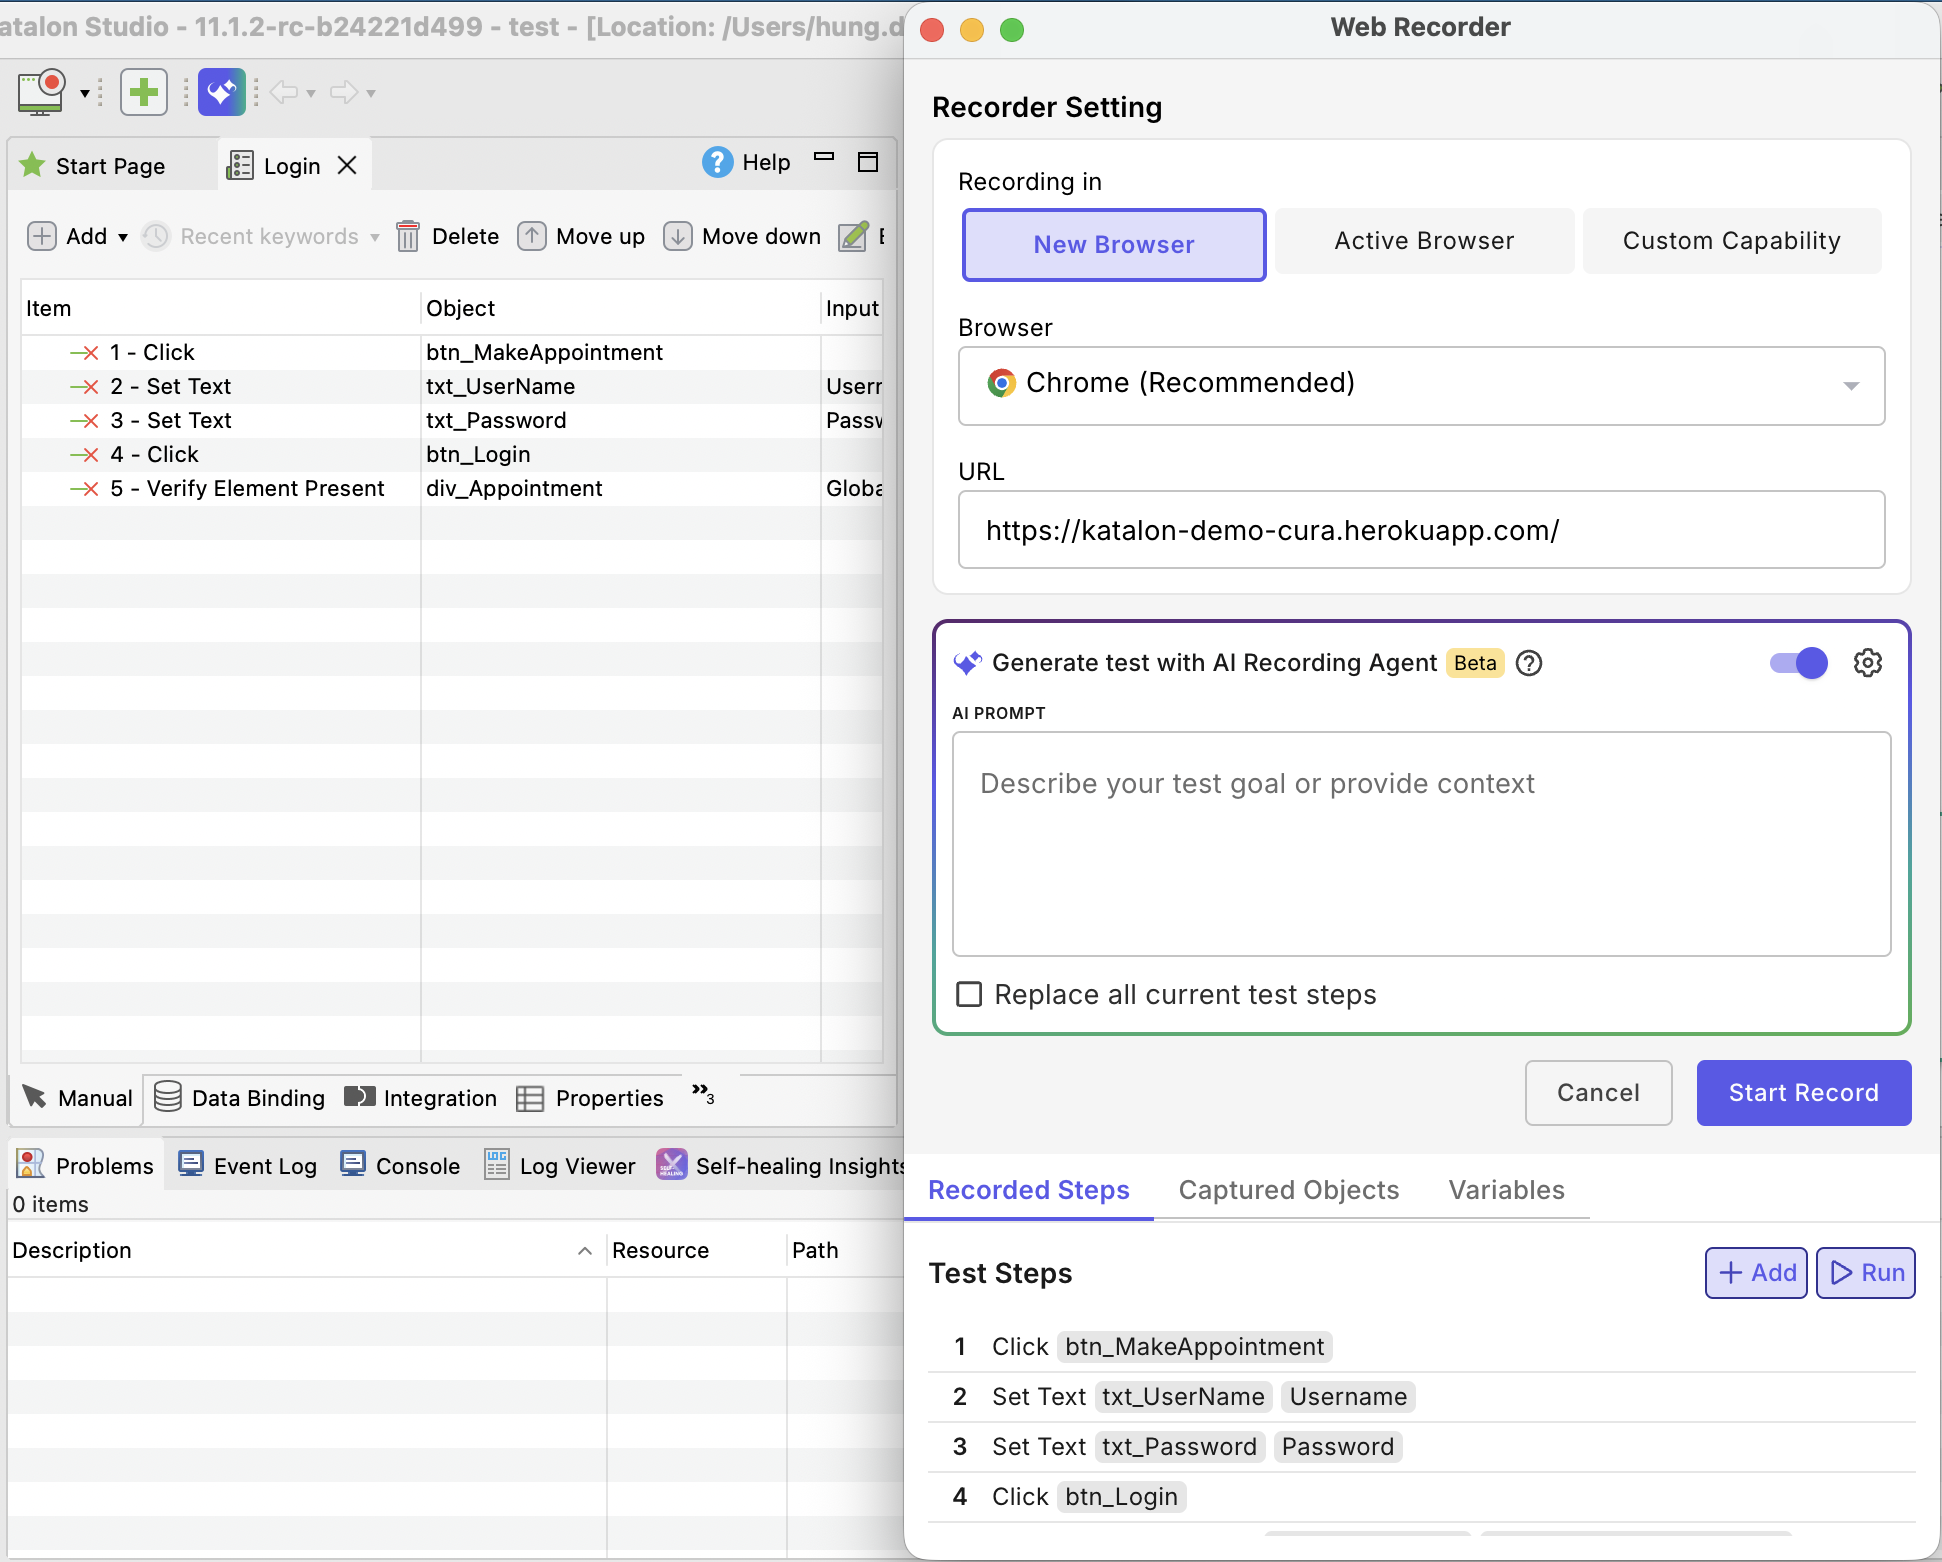
When you open Web Recorder Plus on a test case that already has steps, the Replace all current test steps checkbox appears in the AI prompt area. If you select it, the agent's generated steps will overwrite the existing ones. If you leave it unchecked, the agent appends new steps after the existing ones.
The checkbox does not appear when you start a brand-new recording session with no prior steps.
Changes and Known Limitations
Locator changes
Web Recorder Plus no longer uses an element's text content to create locators, as this proved to be unreliable as the app's codebase updates.
Strategies for CSS and XPath locators are now improved for better accuracy.
You can also see more configuration options for element locators, under Project > Settings > Test Design > WebUI, including default locator strategies (XPath, CSS, Attributes) and pattern exclusions for element classes or attributes. See more details on these configurations at Configure exclusion patterns from locator generation.
Performance issues with Smart Locator
On certain websites, using Web Recorder Plus with Smart Locator feature may cause performance issues. To avoid this, turn off Smart Locator after starting Web Recorder Plus:
Locate the Katalon Studio Recording Engine extension icon in the browser instance's toolbar.
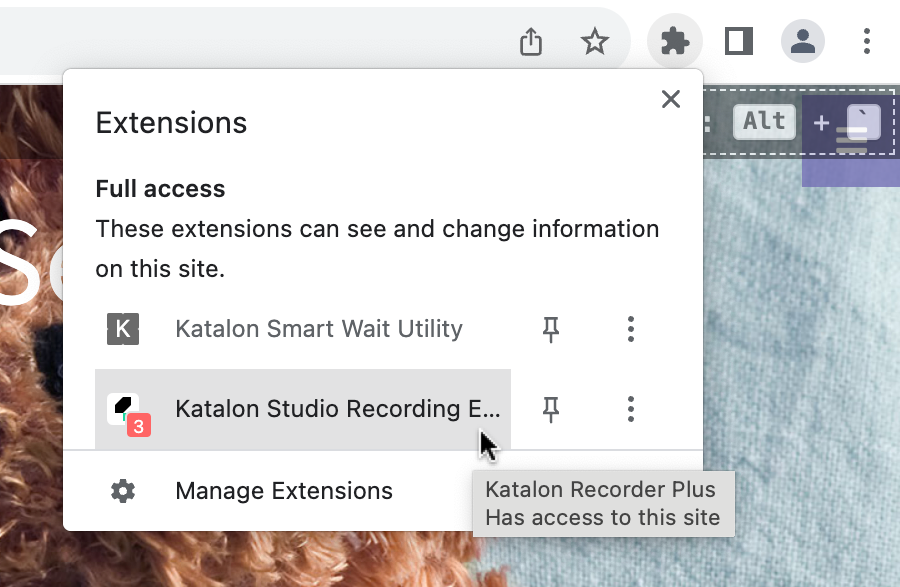
Click the icon, and uncheck the Enable Smart Locator Capture option.

Wrong locator generated when using Attributes
When an object is captured, the default selector has no issues, but attempting to generate a new Attributes locator (id, xpath...) will generate the wrong locator.
Execute test cases for special Web Applications
Test cases recorded using Web Recorder Plus can be executed normally without requiring additional configuration in most scenarios.
However, if your Web Application Under Test (AUT) includes special cases, we recommend enabling Smart Web Inspectors in Project > Settings > Execution > WebUI > Enable Smart Web Inspectors, to ensure stability:
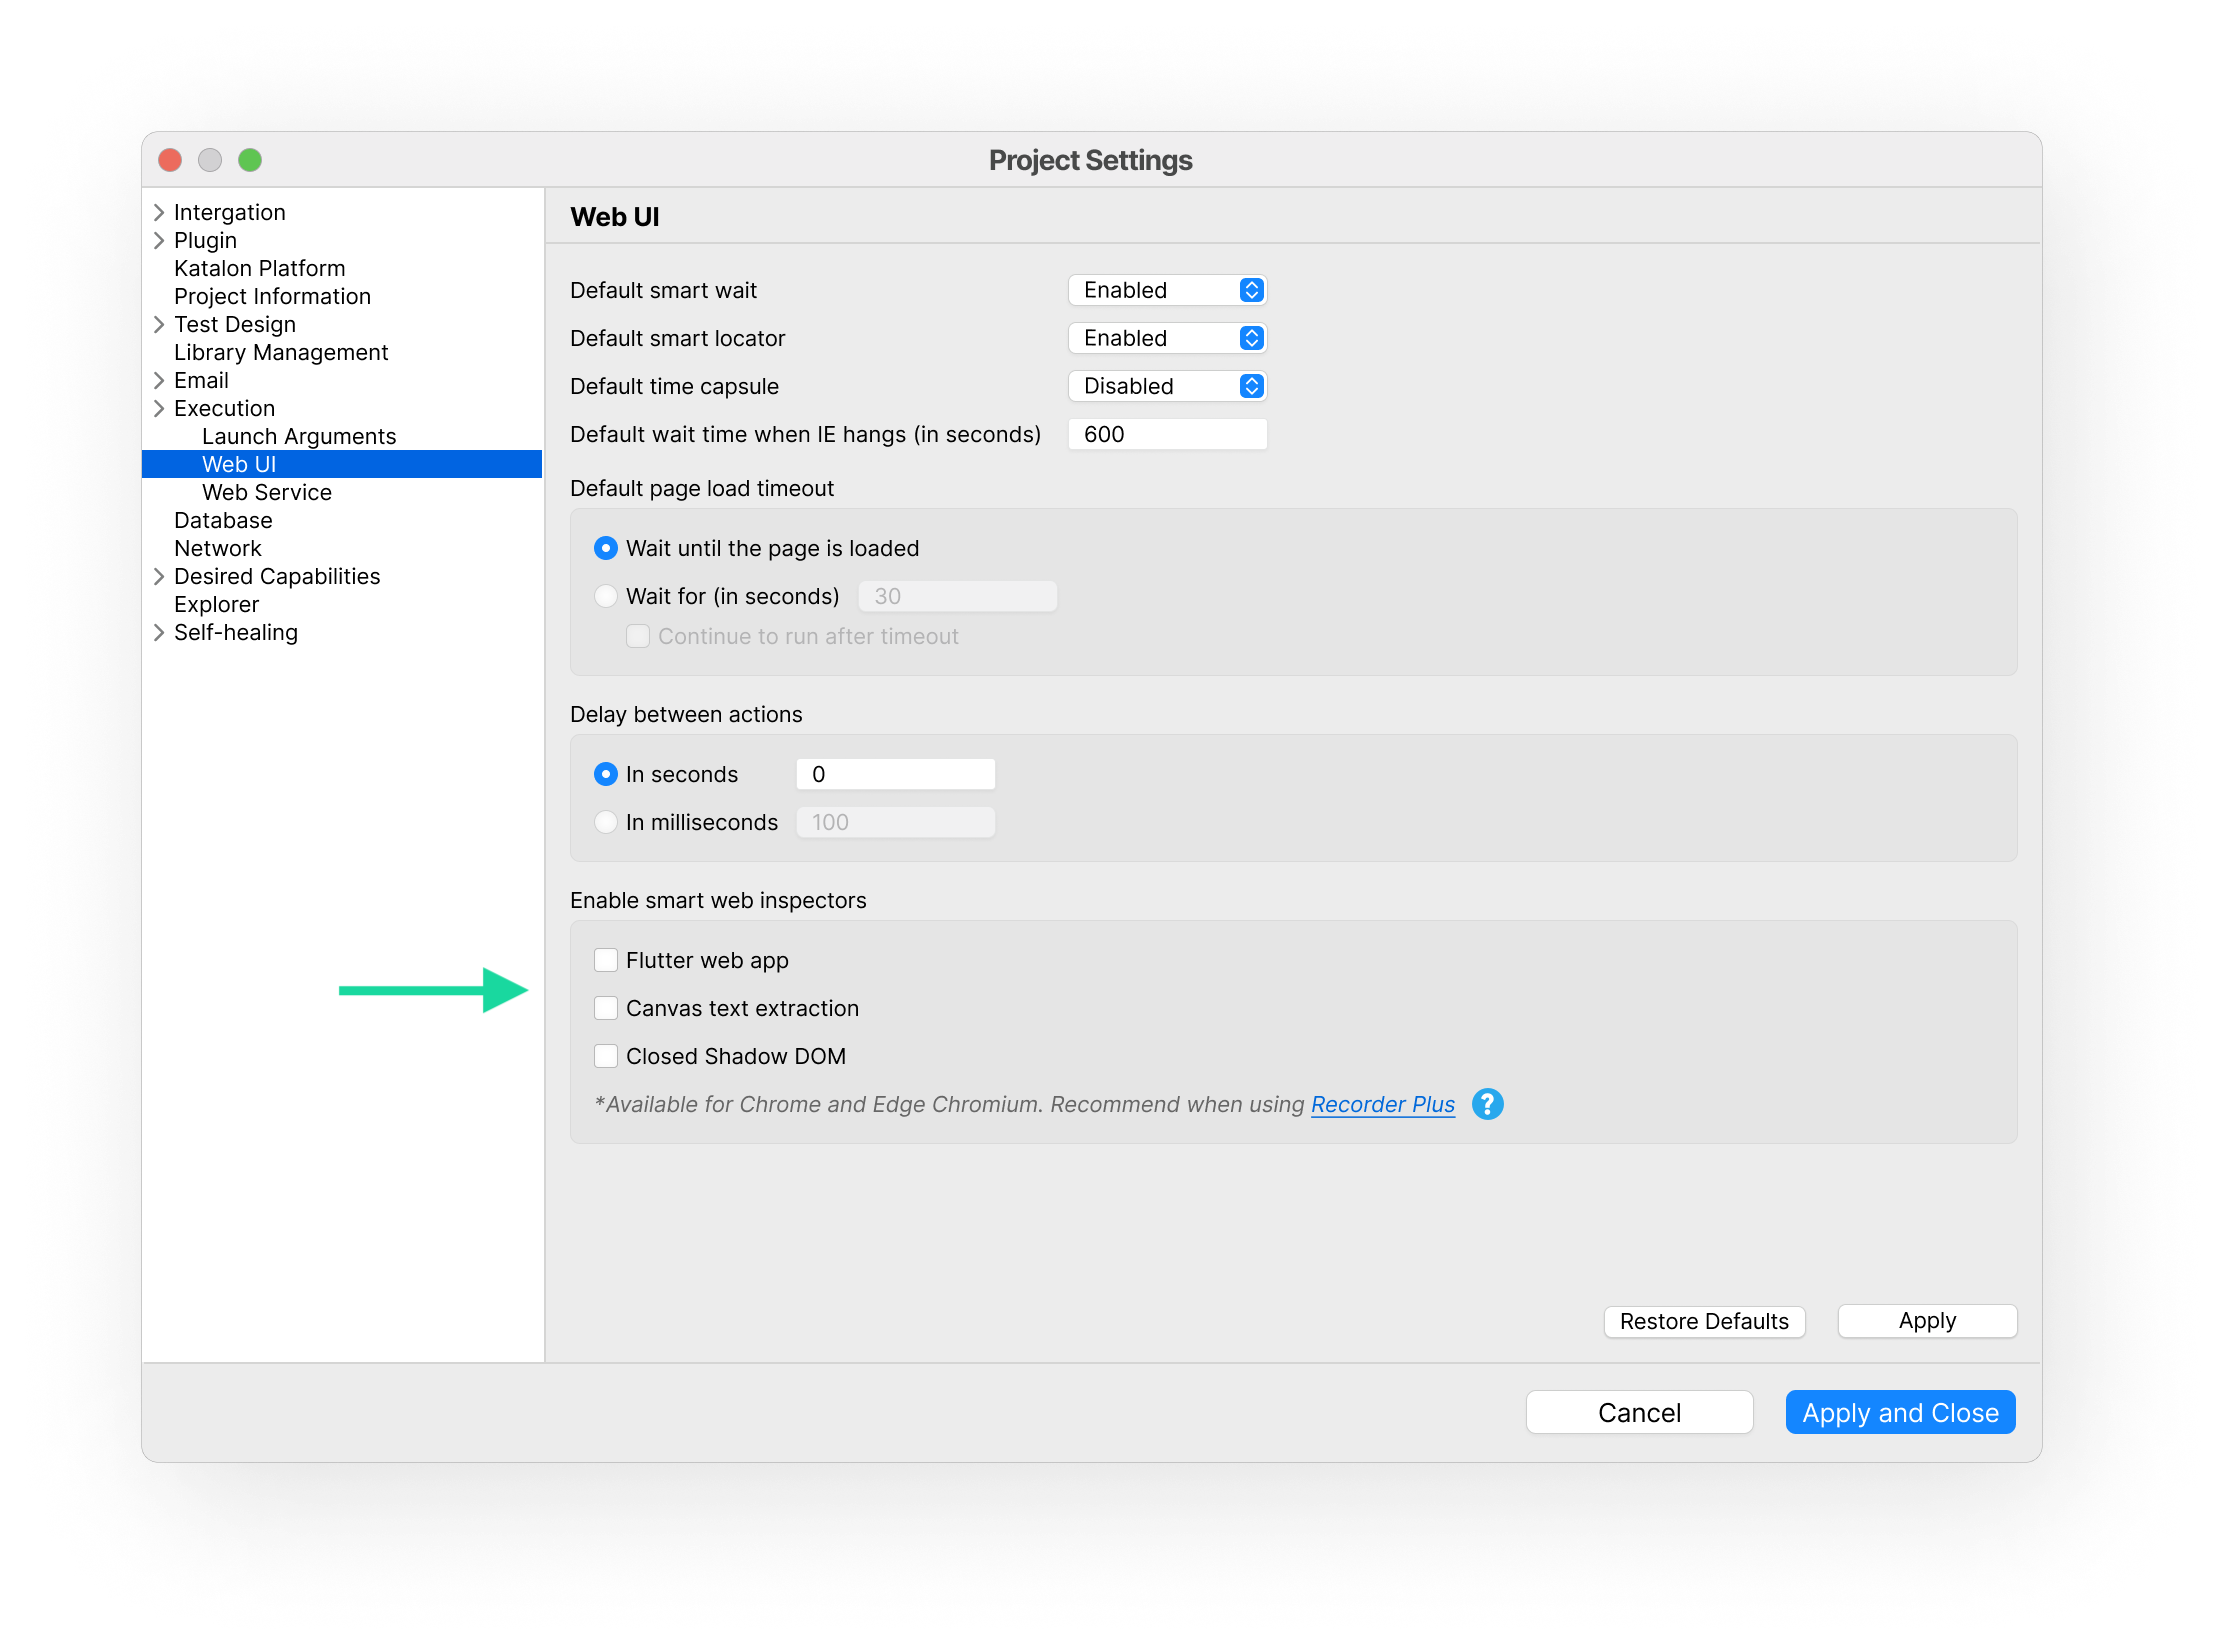
This feature is particularly helpful for the following scenarios:
- Flutter web app: Built with the Flutter framework, these apps use unique DOM structures that often require specialized handling.
Only Web Recorder Plus supports recording interactions on Flutter-based web applications. If you're working with such apps, you must use Recorder Plus for reliable element detection and script creation.
- Canvas text extraction: Content rendered inside HTML5 Canvas elements, which traditional locators cannot detect.
- Closed Shadow DOM: Components encapsulated in closed Shadow DOM, which limits access to internal elements using standard methods.
- Obstructed UI elements: Certain elements—such as calendars, dropdowns, or select boxes—may be partially or fully hidden behind transparent or invisible layers, making them difficult to capture or interact with during recording or execution.
For more information about WebUI execution settings, see WebUI settings.
If you are testing a Flutter web app using Katalon Studio version earlier than 10.2.0, use a custom keyword to inject JavaScript that enables element interaction by exposing Flutter semantic nodes. For implementation guidance, see Introduction to custom keywords.
Below is the custom keyword script that enables interaction with Flutter-based web applications:
package mypackage

import com.kms.katalon.core.annotation.Keyword
import com.kms.katalon.core.webui.keyword.WebUiBuiltInKeywords as WebUI

public class FlutterBasedKeywords {

  static String script = """
    (function() {
      "use strict";
      function l(t) {
        new MutationObserver(e => {
          e.some(r => !(r.type !== "childList" || r.addedNodes.length === 0)) && t()
        }).observe(document, { childList: !0, subtree: !0 })
      }
      function s(t = document) {
        if (!t.querySelector("flutter-view")) return;
        t.querySelectorAll("flt-semantics-placeholder").forEach(i => { i.click() });
        const e = t.querySelector("flt-glass-pane");
        if (!e || e.activated) return;
        e.activated = !0;
        const n = document.createElement("style");
        n.innerHTML = \\`
          flt-semantics {
            pointer-events: all !important;
          }
          flt-semantics-container {
            left: 0;
            top: 0;
          }
        `\\;
        n.id = "flutter-override-styles";
        document.head.appendChild(n);
        const r = e.shadowRoot?.querySelector("flt-semantics-placeholder");
        r && r.click();
      }
      function o() {
        navigator.webdriver && (s(), l(() => { s() }));
      }
      o();
    })();
  """;

  @Keyword
  public static void activateFlutterBasedWebApp() {
    WebUI.executeJavaScript(script, null)
  }
}
Here is an example of how to use the custom keyword in your test script (update the mypackage name to match your project structure):
WebUI.openBrowser('<https://flutter.github.io/samples/web/material_3_demo/>')

CustomKeywords.'mypackage.FlutterBasedKeywords.activateFlutterBasedWebApp'()
//or FlutterBasedKeywords.activateFlutterBasedWebApp()

WebUI.click(findTestObject('Object Repository/Page_Material 3/flt-semantics_Elevated'))